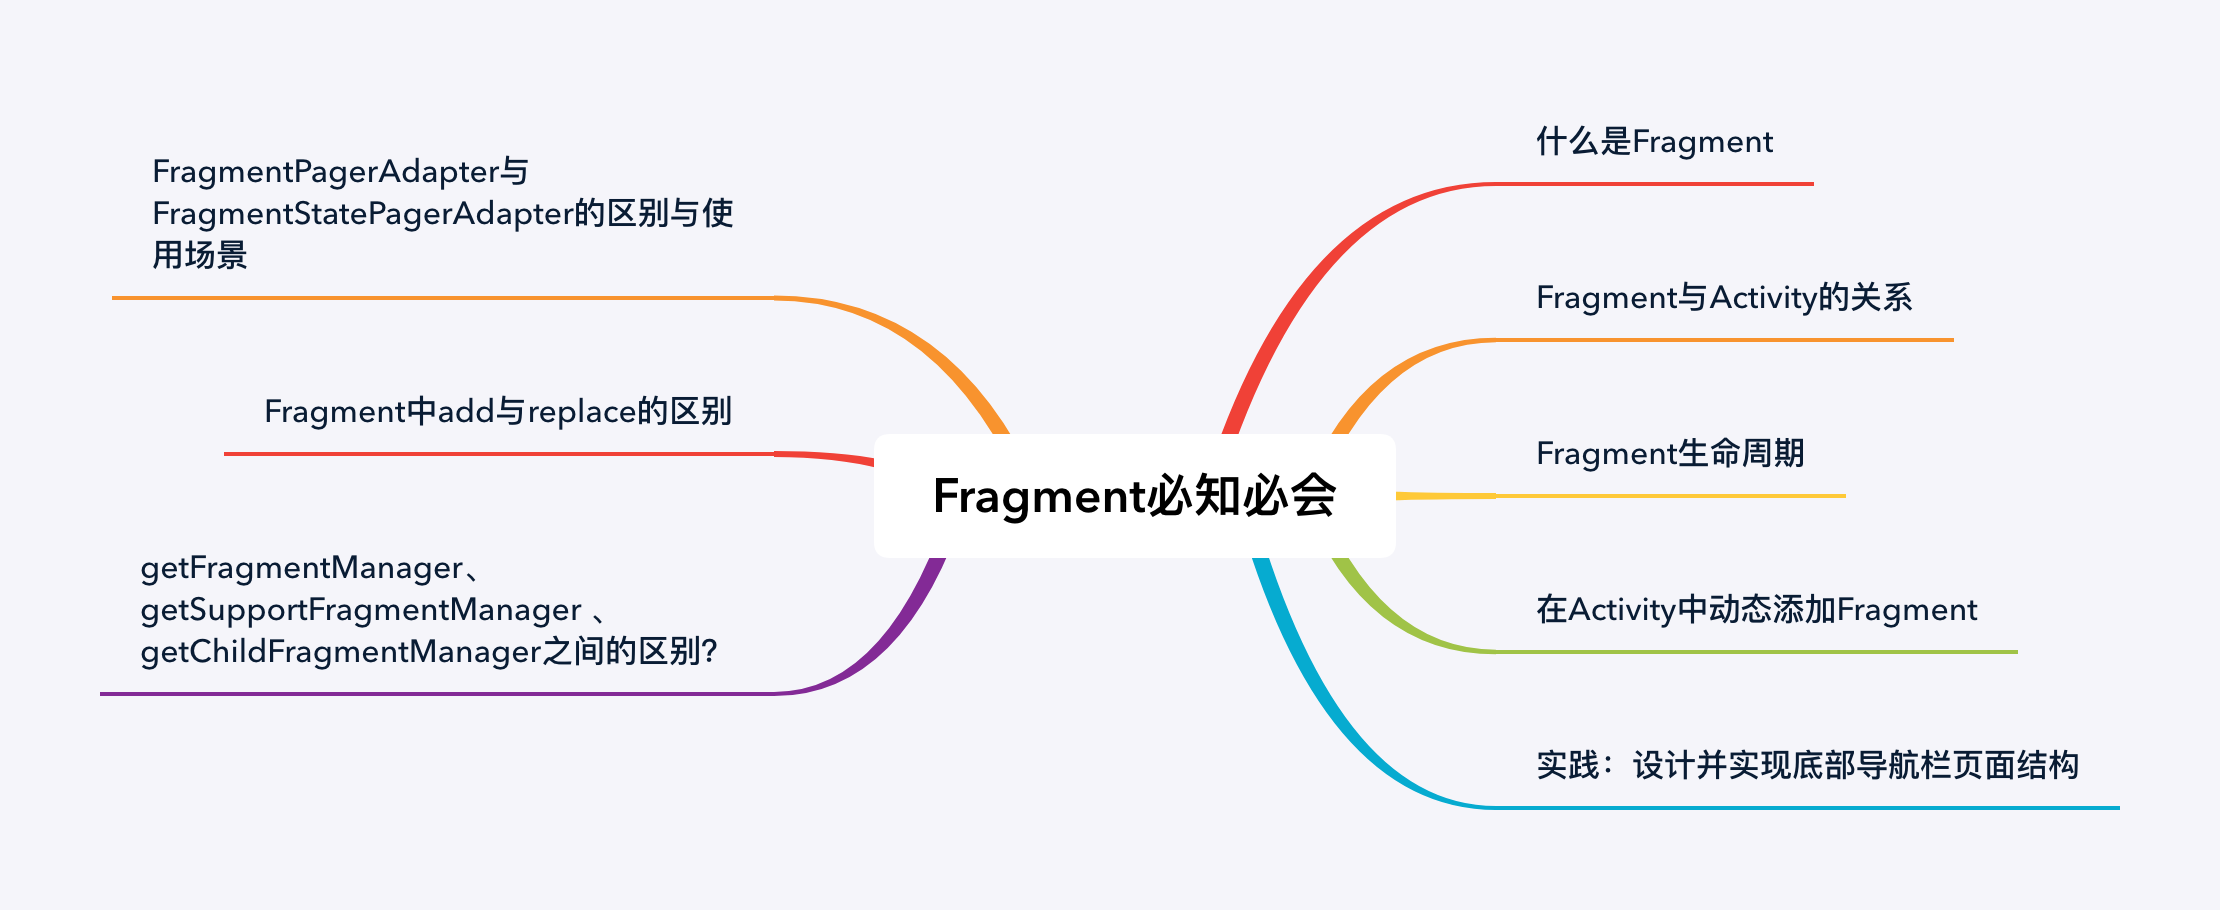
Fragment必知必会
Fragment出现的背景
初衷:Fragment是Android3.0后引入的一个新的API,他出现的初衷是为了适应大屏幕的平板电脑, 当然现在他仍然是平板APP UI设计的宠儿。
现状:现在我们普通APP开发也经常会用到Fragment,如果一个界面很复杂,我们把所有代码都写在一个Activity里面,页面布局都写在同一个xml文件中。过不了多久我们就会发现写不动了,一个Activity上万行代码,非常难以维护,后续如果有变动,更是无从下手。而使用Fragment 我们可以把页面结构划分成几块,每块使用一个Fragment来管理。这样我们可以更加方便的在运行过程中动态地更新Activity中的用户界面,日后迭代更新、维护也是更加方便。
注意事项: Fragment并不能单独使用,他需要嵌套在Activity 中使用,尽管他拥有自己的生命周期,但是还是会受到宿主Activity的生命周期的影响,比如Activity 被destory销毁了,他也会跟着销毁!一个Activity可以嵌套多个Fragment。

Fragment的生命周期

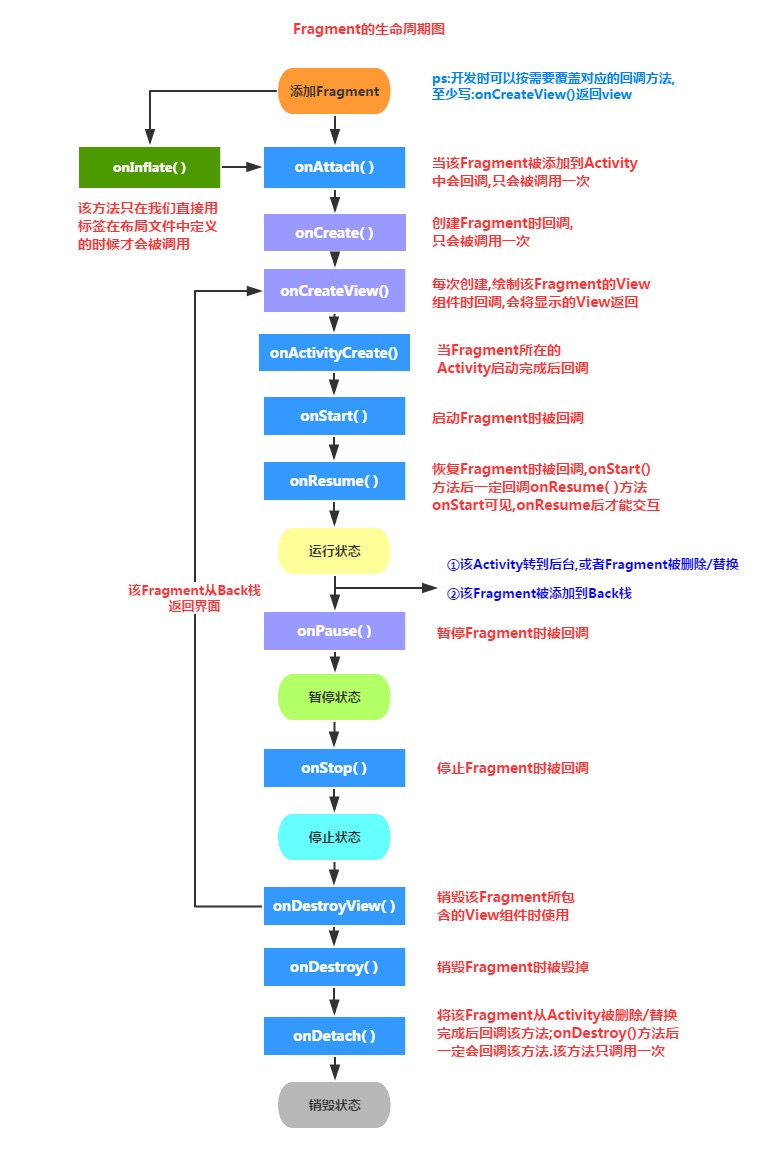
思前想后还是决定要带大家简单的走一趟生命周期图,加深大家对Fragment生命周期的理解:
①Activity加载Fragment的时候,依次调用下面的方法: onAttach -> onCreate -> onCreateView -> onActivityCreated -> onStart ->onResume
②当我们启动一个新的页面, 此时Fragment所在的Activity不可见,会执行 onPause
③当新页面返回后,当前Activity和Fragment又可见了,会再次执行onStart和 onResume
⑥退出了Activity的话,那么Fragment将会被完全结束, Fragment会进入销毁状态 onPause -> onStop -> onDestoryView -> onDestory -> onDetach
Fragment的动态添加与数据传递
动态添加Fragment
①// 定义StudyFragment需要继承自Fragment,并且绑定布局文件
class StudyFragment : Fragment(R.layout.fragment_study,container) {

}

②// 在Activity中使用supportFragmentManager管理Fragment,添加到界面上
class MainActivity:AppCompactActivity{
   override fun onCreate(savedInstanceState: Bundle?) {
        val studyFragment =  StudyFragment();
        val bundle = Bundle()
        bundle.putInt()
        studyFragment.argments= Bundle
        supportFragmentManager.beginTransaction()
           .add(R.id.container, studyFragment).commitAllowingStateLoss()
   }
}
Fragment常见的操作
val fragment = StudyFragment()
val ft = supportFragmentManager.beginTransaction()

if(!fragment.isAdded()){
  ft.add(R.id.container,fragment) //把fragment添加到事务中,当且仅当该fragment未被添加过
}
ft.show(fragment) //显示出fragment的视图
ft.hide(fragment) //隐藏fragment,使得它的视图不可见
ft.remove(fragment)//移除fragment
ft.replace(R.id.container,fragment)//替换fragment,之前添加过的fragment都会被暂时移除,把当前这个fragment添加到事务中

ft.commitAllowingStateLoss()提交事务,执行对fragment的add、replace、show、hide操作
给Fragment传递数据
class MainActivity:AppcompactActivity{

     override fun onCreate(savedInstanceState: Bundle?){

       val studyFragment =  StudyFragment();

       // 创建bundle对象、并填充数据赋值给fragment的argments字段
       val bundle = Bundle()
       bundle.putInt("key_int",100)
       bundle.putString("key_string","key_string_value")
       studyFragment.argments= Bundle

       supportFragmentManager.beginTransaction().add(R.id.container,    studyFragment).commitAllowingStateLoss()

     }
}
class StudyFragment : Fragment(R.layout.fragment_study) {
     override fun onViewCreated(view: View, savedInstanceState: Bundle?) {
          // 取出参数
          val intArgument = argments?.getInt("key_int")
          val stringArgument = argments?.getInt("key_string")
     }
}
[!NOTE|style:flat]
思考:运行时Fragment如何获取Activity中的数据、又如何将数据传递到Activity中呢?
实践:设计并实现底部导航栏页面结构
Activity页面布局
<?xml version="1.0" encoding="utf-8"?>
<LinearLayout xmlns:android="http://schemas.android.com/apk/res/android"
    xmlns:app="http://schemas.android.com/apk/res-auto"
    xmlns:tools="http://schemas.android.com/tools"
    android:layout_width="match_parent"
    android:layout_height="match_parent"
    android:orientation="vertical">

    <FrameLayout
        android:id="@+id/container"
        android:layout_width="match_parent"
        android:layout_height="0dp"
        android:layout_weight="1" />

    <com.google.android.material.button.MaterialButtonToggleGroup
        android:id="@+id/toggle_group"
        android:layout_width="match_parent"
        android:layout_height="wrap_content"
        app:selectionRequired="false"
        android:background="#08000000"
        app:singleSelection="true">

        <com.google.android.material.button.MaterialButton
            android:id="@+id/tab1"
            style="@style/Widget.MaterialComponents.Button.UnelevatedButton"
            android:layout_width="0dp"
            android:layout_height="wrap_content"
            android:layout_weight="1"
            android:backgroundTint="@android:color/transparent"
            android:text="Tab1"
            android:textColor="#000000"
            android:textSize="12sp"
            app:icon="@drawable/ic_home_black_24dp"
            app:iconGravity="textTop"
            app:iconTint="@color/black"
            tools:ignore="HardcodedText" />

        <com.google.android.material.button.MaterialButton
            android:id="@+id/tab2"
            style="@style/Widget.MaterialComponents.Button.UnelevatedButton"
            android:layout_width="0dp"
            android:layout_height="wrap_content"
            android:layout_weight="1"
            android:backgroundTint="@android:color/transparent"
            android:text="Tab2"
            android:textColor="#000000"
            android:textSize="12sp"
            app:icon="@drawable/ic_notifications_black_24dp"
            app:iconGravity="textTop"
            app:iconTint="@color/black"
            tools:ignore="HardcodedText" />

        <com.google.android.material.button.MaterialButton
            android:id="@+id/tab3"
            style="@style/Widget.MaterialComponents.Button.UnelevatedButton"
            android:layout_width="0dp"
            android:layout_height="wrap_content"
            android:layout_weight="1"
            android:backgroundTint="@android:color/transparent"
            android:text="Tab3"
            android:textColor="#000000"
            android:textSize="12sp"
            app:icon="@drawable/ic_dashboard_black_24dp"
            app:iconGravity="textTop"
            app:iconTint="@color/black"
            tools:ignore="HardcodedText" />

    </com.google.android.material.button.MaterialButtonToggleGroup>
</LinearLayout>
监听选中事件
toggle_group.addOnButtonCheckedListener { group, checkedId, isChecked ->
            val childCount = group.childCount
            var selectIndex = 0
            for (index in 0 until childCount) {
                val childAt = group.getChildAt(index) as MaterialButton
                if (childAt.id == checkedId) {
                    selectIndex = index
                    childAt.setTextColor(Color.RED)
                    childAt.iconTint = ColorStateList.valueOf(Color.RED)
                } else {
                    childAt.setTextColor(Color.BLACK)
                    childAt.iconTint = ColorStateList.valueOf(Color.BLACK)
                }
            }
            switchFragment(selectIndex)
        }
toggle_group.check(R.id.tab1)
导航栏切换动态切换显示的fragment
private fun switchFragment(selectIndex: Int) {
        val fragment = when (selectIndex) {
            // 选中第一个tab
            0 -> if (studyFragment == null) {
                studyFragment = StudyFragment()
                studyFragment
            } else studyFragment
            // 选中第二个tab
            1 -> if (notificationsFragment == null) {
                notificationsFragment = NotificationsFragment()
                notificationsFragment
            } else notificationsFragment
            // 选中第三个tab
            2 -> if (dashboardFragment == null) {
                dashboardFragment = DashboardFragment()
                dashboardFragment
            } else dashboardFragment
            else -> throw IllegalStateException("selectIndex下标错误")
        }

        fragment?.let {
            // 把fragment添加到视图容器中,并显示出来,还要把之前已经显示的hide隐藏掉,否则会重叠
            val ft = supportFragmentManager.beginTransaction()
            if (!it.isAdded) {
                ft.add(R.id.container, fragment)
            }
            if (primaryFragment != null) {
                ft.hide(primaryFragment!!)
            }
            ft.show(fragment)
            ft.commitAllowingStateLoss()
            primaryFragment = fragment
        }